Organization accounts
Do you use Soundslice with other people in your company, sharing a single Soundslice login across multiple people? We’re here to help.
Instead of sharing passwords — an icky and insecure practice — you can use our organizations feature. With it, each of your colleagues logs in with a separate Soundslice account. Then, to access your shared slices, you simply “switch into” your organization’s account.
You can switch back and forth, and you can copy slices between your organization(s) and personal user account.
If you’re familiar with Facebook Pages, you’ll feel right at home. This works the same as Facebook’s “Use Facebook as [page]” feature.
Organization accounts are only available to people in the Licensing plan.
Creating an organization
Coming soon! For now, the only way to create an organization is to contact the Soundslice team.
Accessing an organization
To access an organization that you belong to, first log into your personal Soundslice account.
When you’re logged in, click your username at the top right of the screen. You’ll see a menu that lists your organizations:
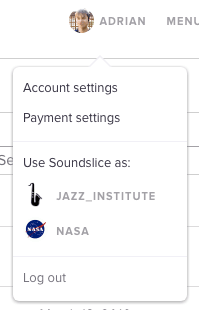
Click the organization you want to access, and you’ll instantly be using Soundslice as that organization.
At any point, you can use the same process to switch back to your personal Soundslice account.
Adding users to an organization
To add a user to an organization:
- Make sure the user has a Soundslice account. It doesn’t have to be a paid account — a free account is fine.
- Make sure you have administrator privileges in the organization.
- Switch into your organization’s account.
- Click your organization name in the top navigation, then select “Account settings.”
- Under “Organization members,” click “Add user.”
- Enter the email address with which the user registered for Soundslice.
- Check the appropriate checkboxes to specify the account’s permissions. (See Account permissions below.
- Submit the form, and you’re done!
Account permissions
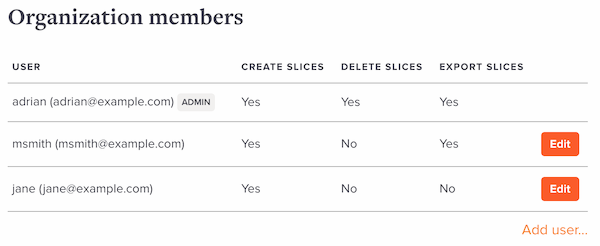
Each member of an organization has various permissions. If you’re an administrator of the organization, you can add and remove these permissions on a per-user basis. You can do this either when you add a user to your organization or by editing an existing user.
The available permissions are:
Administrator
Members with administrator status can:
- View and edit the organization’s member list.
- Add new members to the organization, including new administrators.
- Change existing organization members’ permissions.
- View and edit the organization’s payment information, including the ability to cancel the account.
- Edit the organization’s profile photo.
“Can create slices”
Members with this permission can create slices in the organization account. This includes the “Duplicate slice” feature and the ability to bulk import slices.
Users without this permission will still be able to edit existing slices in the organization account.
“Can delete slices”
Members with this permission can delete slices in the organization’s account.
Users without this permission will still be able to edit existing slices in the organization account.
“Can export slices”
Members with this permission can export slices from the organization’s account.
Removing users from an organization
To remove a user from an organization:
- Make sure you have administrator privileges in the organization.
- Switch into your organization’s account.
- Click your organization name in the top navigation, then select “Account settings.”
- Under “Organization members,” click “Edit” next to the user you want to remove.
- On the next page, click “Remove this user” at the bottom of the page.
- Confirm your decision on the next page.
Moving slices across accounts
In the slice manager, you can move slices across accounts. For example, you can move a slice from your personal account into an organization, or vice versa.
To move a slice, click next to the slice, and choose “Change owner.”
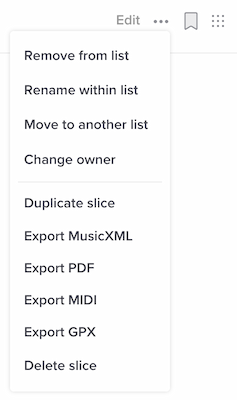
This will show you a list of your organizations. Select one, and the slice will be moved to that organization.
Working with others
Once you have an organization set up, how do you best make use of it? Here are a few things to keep in mind:
If you’re worried that other people in your organization will edit a slice (its notation or syncpoints) while you’re working on it, you can temporarily move it into your personal account. This will prevent anybody else from altering it. When you’re done editing, move it back into the organization.
It’s totally fine for multiple people in an organization to be making edits to different slices at the same time. This includes syncpoints, recordings and the notation itself.
Syncpoints and notation are stored separately in our system. That means one person in your organization can work on syncpoints, while another person works on notation — even for the same slice at the same time.
Logistical information
Here are some logistical details about the organization feature:
- Your Soundslice payment details are stored in the organization itself, not in any of the individual user accounts.
- If your account has embedding privileges, the privileges are in the organization itself, not any of the individual user accounts (unless individual user accounts are also paying for embedding).
- Likewise, if you use a domain allowlist for embedding your organization’s slices, that allowlist is in the organization account.
- An organization can also create courses.
- An organization doesn’t have its own password; it’s accessed solely through its members’ user accounts.